The Ultimate Guide to Baking the Perfect Sourdough Bread at Home
Friends of bread, I am delighted to introduce you to the fascinating realm of sourdough baking! If the thought of creating your own rustic masterpiece fills you with excitement and the smell of a freshly baked bread sends shivers down your spine, then you’ve come to the perfect spot. If you want to know how to make great sourdough in the comfort of your own kitchen, this is the book for you.
Sourdough is more than simply bread; it’s an exciting culinary journey, a challenge to be patient with, and a tasty product of the transformational power of wild yeast. Its golden-brown crust, chewy inside, and sour taste have enchanted diners for generations. Anyone, from complete baking newbies to seasoned pros, may use the information and methods in this book to make sourdough loaves that taste just like the ones served at artisan bakeries.
We will explore the science of sourdough in great detail, outline the necessary equipment and materials, walk you through the baking process step by step, and provide advice on how to overcome obstacles. If you follow this tutorial to the letter, you should be able to bake sourdough loaves with ease and flavor every time. Get your hands dirty, gather up your supplies, and join me on this wonderful adventure to become an expert home baker of sourdough bread.

Baking the Perfect Sourdough Bread at Home
Demystifying Sourdough: What Makes It So Special? – Baking the Perfect Sourdough Bread at Home
An incredible culinary achievement, sourdough bread is the result of centuries-old methods combined with the magic of spontaneous fermentation. Fresh sourdough starter, a culture of wild yeasts and bacteria, is used to leaven sourdough bread instead of store-bought yeast, which is used in commercially yeasted loaves. The distinctive tanginess and chewiness of sourdough are imparted by this one-of-a-kind culture.
Compared to breads made using commercial yeast, the fermentation process for sourdough takes more time and involves more steps. The taste is developed and some of the wheat’s components are broken down during the lengthy fermentation process, which makes the flour easier to stomach for certain individuals. Furthermore, sourdough bread is less likely to induce a rapid increase in blood sugar levels due to its lower glycemic index in comparison to other breads.
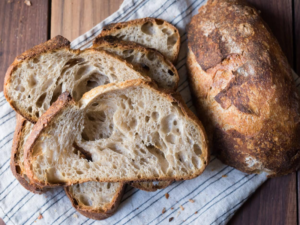
However, sourdough’s enchantment extends well beyond its deliciousness and nutritional value. The crunchy crust giving way to the light, fluffy crumb, the delicate scents of fermentation, and the intricate interplay of flavors make it a sensory experience. The tale it tells is a tribute to the care and work that went into making this bread. Indulging in sourdough bread, whether it’s plain, dipped in olive oil, or used as a foundation for a gourmet sandwich, is a sensory and spiritually satisfying experience.
Essential Tools and Ingredients for Sourdough Success
A few essential equipment and basic ingredients are all you need to start making sourdough. Even while specialist tools are useful, it’s not a big deal if you don’t have everything; common kitchen objects may work just as well.
Tools of the Trade
- Digital Kitchen Scale: Precision is paramount in sourdough baking, and a digital scale ensures accurate measurements of flour, water, and starter. This is arguably the most important tool in your sourdough arsenal.
- Large Mixing Bowl: You will need a large basin to mix and knead the dough. Any big bowl will do, although ones made of stainless steel or glass work best.
- Dough Scraper/Spatula: When working with sticky dough, removing it from surfaces, or portioning it out, a dough scraper is an indispensable tool. You may use an ordinary spatula instead, but a dough scraper is ideal.
- Proofing Basket (Banneton) or Linen-Lined Bowl: To give the loaf its distinctive spiral design during the last rise, a traditional equipment known as a proofing basket (banneton) is used. A standard bowl covered with a linen cloth that has been floured can do in its place if you are without one.
- Dutch Oven or Baking Stone: For the best oven spring and crispiest crust, use a Dutch oven or baking stone to produce a steamy oven environment. A baking sheet will do in their absence; however, it must be heated beforehand.
- Razor Blade or Lame: Scoring the dough before baking requires a specialized instrument called a lame, which has a blade that is razor sharp. You may also use a sharp knife or razor blade, but a lame will give you greater control.
- Instant-Read Thermometer (Optional): Check if your bread is done baking by inserting an instant-read thermometer into the center. Even though it’s not necessary, it’s great for newbies.
Simple Yet Essential Ingredients
- Flour: Many people who bake sourdough advocate using bread flour because of its increased protein content. On the other hand, all-purpose flour works just well, and trying with other flours (whole wheat, rye, spelt, etc.) may provide interesting taste differences.
- Water: Since chlorine might hinder the sourdough starter’s activity, filtered or non-chlorinated water is preferable. To remove chlorine from tap water, which is an acceptable substitute for filtered water, you need let it rest for at least a few hours.
- Salt: Flavor and dough formation are both aided by salt. Instead of iodized table salt, which may give food a metallic flavor, use kosher salt or fine sea salt.
All you need are these ingredients and a few simple equipment to make some tasty sourdough bread. Moving on to the starter, the beating heart of sourdough bread, is next!
Crafting Your Sourdough Starter: The Heart of Your Bread – Baking the Perfect Sourdough Bread at Home
The starter is the primary component of sourdough loaves; it is a culture of live microbes and yeasts. The distinctive taste and rising properties of sourdough are produced by this apparently basic combination of wheat and water. Although it may seem daunting, nurturing a sourdough starter is an enjoyable experience that brings you closer to the age-old custom of bread production.
Creating Your Starter from Scratch
- Day 1: Mix together 100 grams of flour and 100 grams of tepid water in a nonreactive container made of glass or ceramic. Blend until a thick paste is formed. At room temperature (preferably between 21 and 27 degrees Celsius, or 70 and 80 degrees Fahrenheit), cover loosely with a lid or a towel.
- Days 2-6: You should “feed” the starter half a tablespoon of new flour and half a tablespoon of water every day. Recover and mix well. As a somewhat sour fragrance develops and bubbles begin to appear, you will know something is up. That the wild yeasts are starting to flourish is what this means.
- Day 7 and Beyond: Within a few hours of feeding, your starting should begin to show signs of life by doubling in size. When it’s always on, you can use it to make bread!
Recognizing a Healthy Starter
There should be a little bubbling, a hint of sourness, and a little dome on top of a healthy sourdough starter. It has a somewhat spongy feel and seems to be filled with small bubbles when stirred. The recommended time for the starting to double in size after feeding is 4-8 hours.
Troubleshooting Common Starter Issues
- Slow Activity: Increase the frequency of feedings or move the starter to a warmer spot if it isn’t acting up.
- Mold: Too much moisture or storage in a damp area might cause mold to grow on your starter. Get a new one if the starter is moldy.
- Hooch (Brown Liquid): Hooch is a harmless byproduct of fermentation and simply means your starter is hungry. It’s time to feed your starter again.
Obtaining a Starter from Elsewhere
If you’d rather not wait or are short on time, sourdough starter may be obtained in a variety of ways, including from friends, local bakeries, or even online. The cultivation and exchange of sourdough starters is a popular topic in many internet groups.
Making sourdough starter is an interesting process that requires careful observation, some trial and error, and, in the end, some good food. Always keep in mind that a healthy beginning need time to mature, so patience is vital. The amazing taste and texture it adds to handmade sourdough bread makes the effort worthwhile.

Baking the Perfect Sourdough Bread at Home
The Sourdough Baking Process: A Step-by-Step Guide
The fun process of making your own sourdough bread can begin now that your starter is flourishing. The procedure can seem complicated at first, but as you learn it, you’ll find that it’s really very pleasant. The main stages are outlined below:
- Mixing and Autolyse
- Put the flour, water, and active sourdough starter into a large mixing basin. Depending on the recipe, the precise amounts may vary; however, a common recipe calls for 100% flour, 75% water, and 100% starter.
- Mix the ingredients until just combined – it’s okay if it looks shaggy and rough.
- Allow the dough to rest for 20-30 minutes, covered in the bowl. The autolyse process totally hydrates the flour, which makes the dough simpler to handle later on.
- Adding Salt and Kneading
- Dust the dough with salt and start folding it in by hand after the autolyse. Two methods exist for working with dough: kneading it on a lightly floured surface or using the “stretch and fold” method in the bowl.
- The structure and rise of the bread depend on the development of the gluten network, which is assisted by kneading or stretching and folding.
- The dough should feel smooth, elastic, and slightly tacky when it’s ready. This process usually takes about 10-15 minutes.
- Bulk Fermentation
- After a few hours (about 4-8 hours, but may vary with temperature), cover and set aside the dough in a basin that has been gently greased. Bulk fermentation describes this process.
- While waiting for the dough to rise, the starting yeast will feed on the flour’s sugars and release carbon dioxide gas. As the dough goes through bulk fermentation, you may expect it to almost double in size.
- To enhance gluten development and dough strength, you may execute a sequence of “stretch and folds” when the dough is in the bulk fermentation phase. To do this, take the dough and gently raise and fold it over itself from both sides.
- Shaping
- After the dough has doubled in size, carefully move it to a surface that has been lightly dusted with flour. Be cautious not to let it deflate to an extreme.
- Shape the dough into your desired form – a boule (round loaf) or batard (oval loaf).
- A smooth, taut surface with excellent tension may be achieved using any number of shaping processes. As a result, the bread is better able to maintain its form and rise evenly during the final proof.
- Proofing
- Seam-side up, put the formed dough in a basin lined with linen or a proving basket (banneton).
- Dust the dough with flour, cover it with a damp cloth or plastic wrap, and let it rise at room temperature or in the refrigerator overnight.
- The dough is prepared for baking when it has almost doubled in size and slowly returns to its original shape after being lightly poked with a finger.
- Scoring
- warm your oven to 450°F, or 230°C, and set your Dutch oven or baking stone inside to warm just before baking.
- Transfer the dough to a parchment-lined baking sheet by turning it out gently.
- Score the dough’s surface with quick, shallow slashes using a dull or sharp blade. Scoring not only makes a lovely pattern, but it also helps regulate the dough’s growth when baking.
- Baking
- The dough, still on the parchment paper, has to be carefully transferred to the baking stone or Dutch oven that has been warmed.
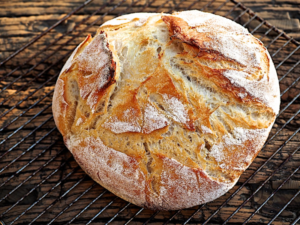
- Wear a lid if you’re using a Dutch oven. When the bread sounds hollow when tapped, it’s done baking. After 20 minutes with the cover on, take it off and continue baking for another 20-30 minutes, or until the crust is a deep golden brown.
- If you’re going to use a baking stone, you’ll need to generate steam in the oven. You may do this by either spraying the oven walls with water or putting a pan of boiling water on a lower rack. To get done, bake for 25 to 35 minutes.
The Art of Perfect Sourdough: Tips and Tricks
Mastering the art of excellent sourdough requires learning the intricacies and experimenting with various ways, but following the basic sourdough baking procedure will get you started. To take your sourdough baking to the next level, consider these suggestions:
Adjusting Hydration Levels
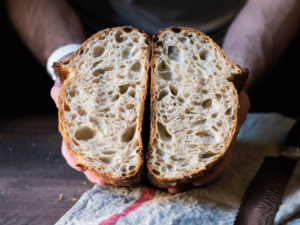
How much water there is in relation to flour is called the hydration level. Dough with a lower hydration (less water) will be denser and have a more open crumb structure with more holes than dough with a greater hydration (more water). Find out what works best for you by trying out various amounts of water.
Exploring Flour Varieties
Although bread flour is an excellent foundational flour, feel free to try different varieties. A little sourness comes from rye flour, a distinctive sweetness from spelt, and a nutty flavor and nutritional value from whole wheat flour round out the flavor profile. To add depth of taste, you may even mix several flours.
Incorporating Add-ins
Adding nuts, seeds, dried fruits, herbs, or olives to sourdough bread elevates it to a whole new level of deliciousness. Incorporate these ingredients into the dough as you finish mixing or kneading.
Achieving an Impressive “Ear”
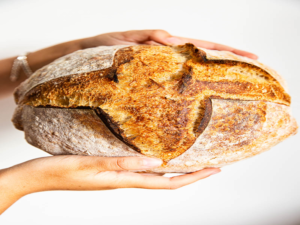
A characteristic of well baked bread is the “ear”—an open, airy pocket—on the edge of a sourdough loaf. It forms when the crust breaks open due to the dough’s quick expansion in the oven. Scoring the dough at a shallow angle and using oven steam during the first stages of baking will promote ear production.
Troubleshooting Common Baking Problems
- Dense Crumb: Underproofing, insufficient gluten formation, or baking at an incorrect temperature may all lead to this. You need to knead the dough well, check that it has risen enough, then bake it at the right temperature.
- Lack of Oven Spring: Overproofing, insufficient oven steam, or excessive scoring might be at blame if your bread doesn’t puff up much when baking. Make sure there is enough steam when baking and adjust the time for proofing accordingly.
- Burnt Crust: A crust that is scorched occurs when baking at too high of a temperature or for too long. To adjust the baking time or temperature, lower the oven rack.
Try out different combinations of these tips and tactics to learn more about sourdough baking and how to make bread that suits your taste. Never forget that perfecting a recipe takes time and effort, and that your sourdough will improve with each bake.

Baking the Perfect Sourdough Bread at Home
Baking Sourdough Beyond the Basics
The sky’s the limit when it comes to tasty creations after you learn the basics of sourdough baking. Because of its adaptability, sourdough may be used in a wide range of recipes and tastes. Here are some ideas to think about:
Sourdough Variations
- Sandwich Loaves: Adjust the hydration level and shaping technique to create soft, sliceable loaves perfect for sandwiches.
- Focaccia: This Italian flatbread is a delightful canvas for toppings like herbs, olives, tomatoes, and cheese. Sourdough focaccia boasts a unique depth of flavor.
- Baguettes: The typical French bread known as sourdough baguettes is long, thin, and crusty; it goes well with everything or as a dip.
- Pretzels: I can’t get enough of sourdough pretzels with their chewy texture and acidic taste. Give them a go either plain or with some salt.
Creating Your Signature Sourdough
The beauty of working with sourdough is that it may change and adapt to your tastes and the way you live. The flour you use, the kitchen temperature, and even air microorganisms all contribute to your starter’s one-of-a-kind taste character as it matures. Try making sourdough with various flours, feeding times, and methods until you find one that works for you.
Maintaining Your Starter
- Being a living organism, a sourdough starter needs constant treatment. There are a few ways you can keep your starter in good working order:
If you don’t bake very often, you may keep your starting in the fridge. To maintain good health, feed it once weekly.
- Drying: Once you’re ready to store your starting for a long time, you may dehydrate it and then rehydrate it. If you’re not a frequent baker or would want to share your starter, this is a great alternative.
- Making a lasting legacy: Sourdough starters are treasured family heirlooms that may be handed down through many generations. To make sourdough baking more accessible, share your starter with those you care about.
Moving beyond the fundamentals of sourdough bread baking is an adventure in discovery. Never be hesitant to go out of your comfort zone, try out other tastes, and see what you can create. Sourdough is a gateway to a limitless universe of possibilities.

Baking the Perfect Sourdough Bread at Home
Frequently Asked Questions About Baking Sourdough at Home – Baking the Perfect Sourdough Bread at Home
Lots of questions arise while baking sourdough bread, particularly for those who aren’t familiar with the process. Here are the answers to some of the most common questions:
Q: Why is my sourdough bread dense and heavy?
A: Several factors can contribute to dense sourdough bread:
- Underproofing: If the dough hasn’t risen enough during bulk fermentation or proofing, it won’t have enough air to create a light and airy crumb. Ensure your dough has doubled in size during both stages.
- Not Enough Gluten Development: The structure of sourdough bread relies on a robust gluten network. Lack of sufficient kneading, stretching, and folding will result in dough lacking the elasticity necessary for proper rising.
- Too Much Flour: The dough could become dry and thick if you add too much flour when shaping. To keep the dough from sticking, use just enough flour, and be careful not to overwork it.
- Baking Temperature: Bread with a thick crumb is the result of baking at too low a temperature, which inhibits appropriate rising. Before you begin, use an oven thermometer to make sure your oven is hot enough.
Q: How do I know when it’s time to use my sourdough starter?
A: It should take 4 to 8 hours after feeding for a well developed sourdough starter to double in size. It ought to be somewhat frothy on top and have a little sour scent. It has a somewhat spongy feel and seems to be filled with small bubbles when stirred.
Q: Can I use all-purpose flour for sourdough bread?
A: You may use regular flour if you want, but bread flour is usually preferable since it has more protein, which makes the gluten stronger and the bread rises and holds its shape better. If you adjust the moisture level correctly, however, all-purpose flour may work just well.
Q: What’s the difference between baking in a Dutch oven and on a baking stone?
A: Dutch ovens and baking stones both contribute to a steamy oven atmosphere, which is essential for achieving the best oven spring and a crispy crust. Because steam is trapped more efficiently in a Dutch oven, the oven spring is more noticeable, and the loaf turns out thicker and crustier. Even with a baking stone, you may need to take extra steps, like spritzing water or putting a pan of boiling water in the oven, to get the desired level of steam.
Q: How do I store my sourdough bread?
A: Sourdough bread keeps best when kept in an airtight container or covered in a clean linen cloth; either way, allow it to come to room temperature. The crust will go soggy if stored in plastic bags, so it’s best to avoid doing so.
When you have any more inquiries, don’t hesitate to ask!
Conclusion – Baking the Perfect Sourdough Bread at Home
Good job! The gratifying process of making sourdough bread at home has begun. Loaves that are both tasty and a reflection of your hard work and expertise may be yours after you learn how to cultivate a lively beginning, comprehend the complexities of baking, and experiment with various methods and tastes.
Always keep in mind that mastering sourdough baking requires perseverance, trying new things, and learning as you go. If you make a mistake the first time, don’t give up; every loaf is an opportunity to improve. Take it all in, relish the handmade sourdough bread’s amazing texture and taste, and revel in the process.
Give your loved ones a taste of what you’ve accomplished with sourdough by sharing your recipes with them. As your baking abilities improve, you’ll find that sourdough bread is much more than a recipe; it’s a way to express yourself, connect with tradition, and enjoy life to the fullest.
The time has come for you to work with the dough and bake a loaf of delicious sourdough bread from scratch. Sit back, relax, and let your senses be swept away to gastronomic heaven by the scent of baking bread and the flavor of sourdough. I hope you like baking!
